环境准备#
查看当前 shell#
echo $SHELL
返回结果
/bin/zsh
安装zsh#
CentOS:
sudo yum -y install zsh
Ubuntu:
sudo apt-get install zsh
为用户设置默认 shell#
为root设置:
sudo chsh -s /bin/zsh
为特定用户设置默认 shell:
sudo chsh -s /bin/zsh <username>
# <username> 替换为实际用户名
返回结果如下,表示切换完成(下载安装 oh-my-zsh 成功后也会提示切换)
# sudo chsh -s /bin/zsh
Changing shell for root.
Shell changed.
安装git#
CentOS:
sudo yum -y install git
Ubuntu:
sudo apt-get install git
安装oh-my-zsh#
sh -c "$(curl -fsSL https://raw.githubusercontent.com/ohmyzsh/ohmyzsh/master/tools/install.sh)"
切换皮肤#
自带的oh-my-zsh皮肤,有点不好看,所以我推荐你可以换皮肤。编辑~/.zshrc这个ZSH配置文件,进行更改:
vim ~/.zshrc
修改皮肤参数:
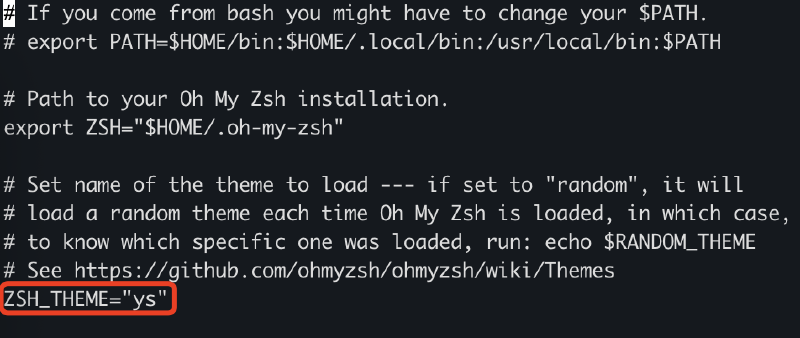
再重载配置:
source ~/.zshrc
安装插件#
安装自动补全 zsh-autosuggestions#
git clone https://github.com/zsh-users/zsh-autosuggestions $ZSH_CUSTOM/plugins/zsh-autosuggestions
安装语法高亮 zsh-syntax-highlighting#
git clone https://github.com/zsh-users/zsh-syntax-highlighting.git $ZSH_CUSTOM/plugins/zsh-syntax-highlighting
引入插件#
在~/.zshrc中引入插件:
plugins=(
    git
    zsh-syntax-highlighting
    zsh-autosuggestions
)
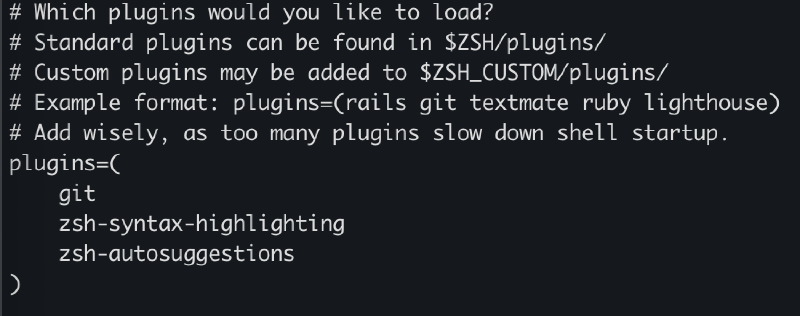
source ~/.zshrc